Friday, July 1, 2016

Pretty poncho

It's the middle of winter here in Cape Town, where that rainy chill gets deep into your bones and makes everything cold..especially after sunset and when the wind is blowing..stew and soup weather and crochet time!

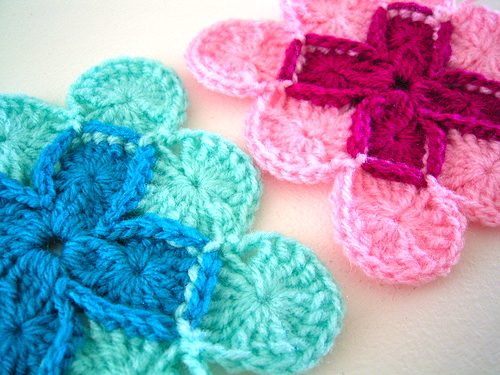
Having made Sophie last year, I needed something else to get the brain going (and I just can't get into making the Last Dance on  the Beach CAL)...so I found Charlotte. I have enough wool that I  bought for the CAL to make 4 Charlottes and then I can stitch them together to make a blanket! Yippee! Loving her so far!
Part 1 of Charlotte.

Part 2 half way done


We're on winter school holidays at the moment,so I'm also playing in the kitchen...not something I have the chance or the time to do during the term. Behold the ultimate burger. ... and Asian stir fry!

Garlic butter grilled roll homemade mushroom sauce and patty, with crispy onion rings on the side...mmmm


 And of course some more crochet! I found a stunning poncho while cruising that terrible terrible place called Pinterest.....LOL.... there was no pattern, so I engineered my own. Have a look at her ponchos though, they are stunning!
Very chuffed with how mine worked out...and am now busy with another one for the youngest gannet.
My 4 square poncho....designed by me!!

Happy days
PennyB


Saturday, March 26, 2016

New beginnings

2015 was indeed an "annus horribulus" of whopping proportions....and it is now thankfully behind us. This year has brought some changes with it that will only make us stronger!

So after 4 years of being out of the classroom, I started this year with a little trepidation and lots of enthusiasm as I walked into my grade 7 class as a full time teacher again! It's been a whirlwind term - does teaching ever happen slowly - but it's felt so good to be back in the classroom! 
My next step is to get back into my art again...as this was another thing that was put on the back burner last year. It seemed that every time I sat down to draw/paint/tangle the inspiration disappeared. So I visited my old friend The Diva and got myself tangling again! I couldn't have started at a better time with one of my favourite tangles -Shattuck. 

The funniest thing is, that I used it on the walls to liven up the grade 7 passage (with a few other doodly-tangles of course! 


The quote above my door.


The wall of my classroom with the top row still in process...


The walls between the windows

My tile for Challenge #260

The other thing we are crazily busy with at school is 67 Blankets for Mandela. A group of us are "Crafty Chicks" and are always inspiring each other to make new things. Last year we entered the school competition  - which was a minimum of 21 blankets and won or school R21 000!! This year, the target is 22 blankets and we had 18 on break up day! All our staff and quite a few parents are busily working  up squares so we can reach our target again.


One of the collabrative blankets I was joining together...number 17!
I even dug out a WIP from a year ago which I hadn't started putting together and have just finished the edging!


All in all, it's been a good start to the year and I'm enjoying myself so far!

Keep crafting

PennyB


Thursday, June 4, 2015

Wool, needles, hands

 It always amazes me how we switch from one crafty pursuit to another whenever we discover another idea...in most cases for everyone I think,  via that most dangerous of places-Pinterest!

I've always loved crocheting over knitting and this year is no different. I got tired of making the same things over and  over, and there's only so many blankets you can have in the lounge/bedrooms! So I started scouring  YouTube and Pinterest, of course, for different afghan patterns...easy ones of course! So here are few links to stunningly different, but fairly simple afghans. 

1. Wool eater


2. Granny ripple
I can't locate the site where this pattern is published, but it's so easy and brings a welcome change to the traditional granny square.


My ripple afghan for my daughter.

3. Diagonal crochet 
Diagonal crochet or simply C2C (corner to corner) is a lovely variation and easier than it looks! There are so many tutorials on how to do this stitch, but this YouTube clip is by far my favourite! She's Australian, so the terminology is UK and not USA.


4. Entrelac crochet
This had always looked interesting, but the various patterns I've looked at were very confusing. Until I watched  this video!  This pattern us so much fun and so much easier than it looks.
The blanket I'm busy with at the moment.


Especially for all my southern hemisphere friends as we rapidly enter the heart of winter. Nothing like an afghan-on-the-go on your lap to keep you warm!

Keep crafting


PennyB

Sunday, February 15, 2015

Lifesaving and Nippers

Greetings from a windswept and beached out mom!

We are gearing up for our regional championships and National Championships in both Nippers and Lifesaving at the moment and so are spending pretty much every weekend on the beach! We have one gannet still as a nipper and the other is a lifesaver, and their competitions are back to back at the moment!
The early morning drizzle and cloud made a pretty picture at 6:30am!


I'm still, however, finding time to craft and spend me time...which as we all know is of paramount importance! My CAL blanket is almost finished...I've attached all the squares together and am now starting on the border! I've been VERY good too about not doing any other crochet project while I do this one!


Journal 52 has been fun too (haha..that rhymes!) and I was particularly please with my page for prompts 4 and 5...TV and Windows.


In my second Step by step Art journal technique post, I've moved out of my comfort zone, which is to put lots of paint on the page. It's not my favourite thing to do, I feel the pages are too thick.

Step 1: Gesso the page so that it can withstand everything else.
 
 Step 2: Cut and paste a book/magazine/scrapbook page onto the gesso. If yo have a heat gun, it makes the drying process much faster!

 Step 3: Paint your chosen colour over the magazine/book page. Keep it slightly watered down so that the page shows through...otherwise what's the point of using it?!


Step 4: Using acrylic white and a piece of bubble wrap, stamp onto the page. (I use acrylic paint because the white watercolour doesn't show up!)


Step 5: I used a foam stamp and watercolour to stamp the blue


Step 6: More stamps and more colours. (I use stamps because I don't have stencils!)


Step 7: Using black ink and my conversation bubble stamp I stamped 4 bubbles. I then cut out the telephone pictures from this VERY old school textbook!


Step 8: Glue everything down and voila!


Happy creating
PennyB

Saturday, January 17, 2015

Tarn...ation!

I'm on a crocheting kick...still...I've always preferred crocheting to knitting, and have started working on my WIPs- (New Years Resolution #2)! I started a scarf last year sometime and stopped when I got to the border. Basically the given border was a little tricky to  understand at the time, so I stopped. I'm now crocheting the border with my own pattern! 

In between all this, I've been doing Marinke's 2014 CAL which has/is so much fun! 12 weeks...10 patterns...60 squares...joining and edging instructions...blanket! I've got 6 squares to go and then I start joining.
My stash of squares so far...

Playing with the layout...

My next project is going to be a large circular floor rug made from tarn. (For those who don't know, tarn is T-shirt yarn which can be made from old T-shirts or T-shirt material.) A ready made ball of tarn (50g) costs R50, which works out quite expensive when you want to make something big...so off to our local fabric shop I go, and buy 2m of denim blue T-shirt material @R30 pm. I then cut and cut and cut and cut...and wound it all up into a HUGE ball weighing in at 560g!! and it only cost me R60!!

T
The cutting process...

A close-up of how to cut the fabric to get a continuous strip!

Once cut, you stretch the  strips as you wind to get the edges to curl. My 560g ball of tarn!


And finally, my New Years Resolution #1, to participate in the The Diva's weekly challenges again! THis challenge is her 200th challenge - well done Diva! We were asked to tangle out Go-to tangle...and mine is Nzeppel (with a few tangleations)


Happy creating


PennyB

Monday, January 12, 2015

Afternnon and Happy New Year!

So it's been a few months...{am on knees begging forgiveness}... My New Years Resolution is to resurrect my blog! For those faithful that were following my 365 days of Creativity, I did in actual fact complete my task - it just got too much posting each week (insert sad face here!) There were days where I didn't do much, but I did something - which was the test!

I have introduced a few friends at school to Art Journalling and we've started a WhatsApp group called Crafty Chicks. I took them all shopping to our big Art store - The Deckle Edge - (we only have one really) to buy a journal, a waterbrush and a black Sakura pen. We are all taking part in Journal 52 ,which I did last year and they decided it was a good place to start!

SO I thought I'd post a step by step for my friends on how I do some of my journal pages:


Step 1 is to colour with watercolour pencils.
I then wipe over the colour with a baby/face wipe, which doesn't wet the paper so much!


Step 2 I use watercolour paints to draw my background shapes and edge the page.


Step 3 I outline the shapes with a fine marker - this one I used blue because the edge of my page is blue.


Step 4 I used some left over paper strips and my watersoluble graphite pencil and my watercolur paints to make some colour strips to punch shapes from...


Step 5 I create shadows in the shapes with my graphite pencil


Step 6 I start doodling my outside edges...


 Step 7 After figuring out what quote I was going to use,  I glue my punched squares into position and write my quote. Each square was then edged with a charcoal pencil which I smudged.


Step 8 I completed the doodles!


I also took part in  Julie Gibbons 5 Days of Mandala Magic which was such fun!  I learnt how to create a lotus flower mandala and the Hamsa - which turned out pretty well!


My other New Year's Resolution is to continue with The Diva's weekly zentangle challenges...this week being special as it's the 200th Challenge!

Happy creating everyone...see you soon


Pennyb


Tuesday, August 12, 2014

A glimpse of summer!

Long time, no blog!

Ok, so enough is enough! I've given myself  a stern talking to about keeping up and am feeling chastised and determined to do this right!

So I'm still looming (I've almost finished my poncho...just adding tasssles-can't have a poncho without tassles! I've also made 2 pairs of socks...such fun and quick and easy.


DLP is forever in catch-up mode, I think there's quite  few of us!


And then when I'm not catching up with DLP,  I draw!


Happy creating
Penny B